What is a Debris Shelter?
A debris shelter is a compact, insulated survival shelter built primarily from natural materials such as sticks, leaves, pine needles, and bark. Designed to retain body heat and protect against wind and cold, it’s one of the most effective shelters for survival situations when warmth is a top priority.
Why Build a Debris Shelter?
- Excellent insulation in cold weather
- Can be built with no tools or cordage
- Offers camouflage and protection from the elements
- Ideal for overnight survival or bushcraft practice
Materials You’ll Need
- A strong ridgepole (5–7 feet long). A fallen tree can also make an excellent ridgepole
- A forked stick or rock to support one end of the ridgepole
- Arm-length sticks to form the frame of the roof
- Debris: leaves, pine needles, grass, moss, bark (preferrably dry)
- Optional: tarp or poncho (for waterproofing)
Step-by-Step: How to Build a Debris Shelter
1. Select a Safe Location
Choose an area that is:
- Dry and slightly elevated compared to the ground around it to avoid water pooling in your shelter area
- Sheltered from wind. Build near natural barriers such as tree thickets, thick hedges, or hills if possible.
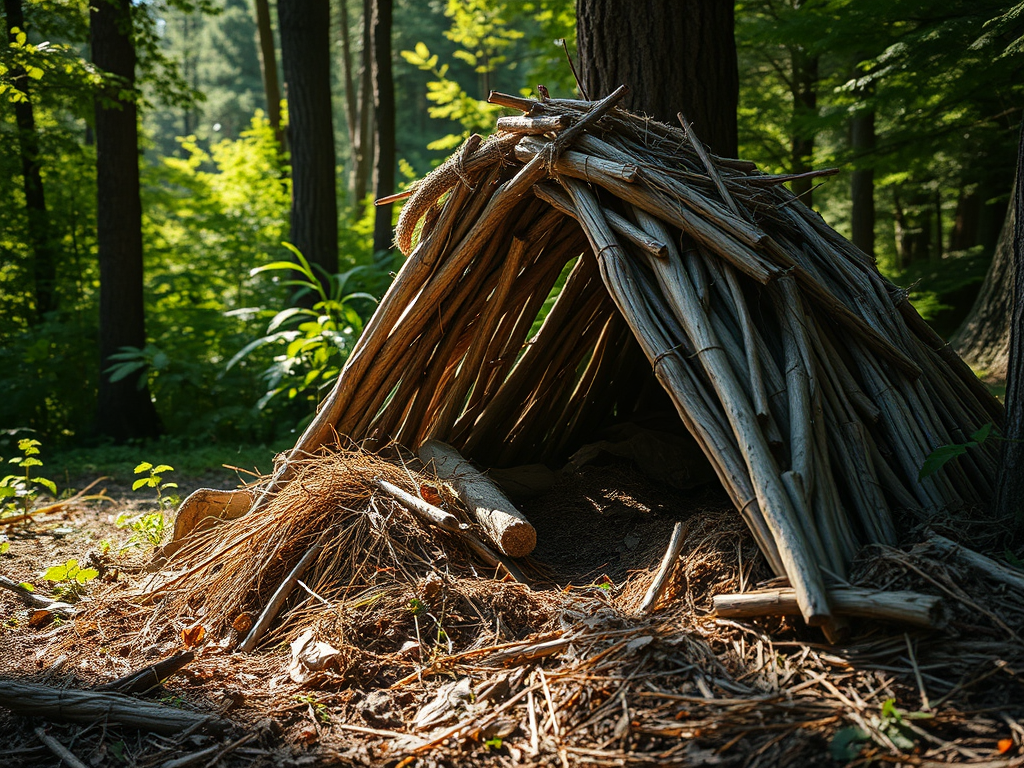
- Near the building materials you will need for construction. This will make construction easier and faster. 2. Set the RidgepoleProp one end of the ridgepole on the forked stick or rock and rest the other end of the ridgepole on the ground. One end should be slightly higher to form a triangle shape between the ridgepole, the ground, and the stick or rock holding up the ridgepole. The taller side should be just high enough that your body will fit snugly inside.
3. Build the Roof Frame
Lean sticks along both sides of the ridgepole to create the frame for the roof. Make sure the gaps between these sticks are minimal to hold the insulating debris better. The end that is resting on the ground should be closed off. The taller end should still have an opening big enough for you to crawl into and out of your shelter.
4. Pile on the Debris
If you have a tarp, lay the tarp over the roof frame. Layer leaves, pine needles, grass, moss, and anything else you can find over the roof frame or on the tarp if using a tarp. You will want to add as much debris as possible, ideally at least 2–3 feet thick. Add branches or sticks on top to keep debris in place.
5. Insulate the Interior
Spread dry leaves, needles, or grass on the floor. Aim for at least 6 inches of padding between you and the ground
Pro Tips
- Don’t overbuild; smaller shelters stay warmer. Keep it tight and low to trap your body heat. If done properly, no fire will be needed with a debris shelter because your body heat should be enough to heat the interior of the shelter by itself.
- Build with the short end of the shelter to the wind. This will best protect you from the wind when you are inside.
- Avoid using wet materials if possible. Dry debris insulates better. Wet or green debris is better than nothing, but to get the same insualting effect you will need significantly more debris. Add another foot or so of debris if the debris is wet or green.
When to Use a Debris Shelter
- Cold-weather survival situations
- When no tools or tarp are available
Final Thoughts
The debris shelter is a tried-and-true bushcraft survival structure that can mean the difference between freezing and staying warm through the night. Its simple construction is easy to pull off with minimal tools and offers a safe, warm place to sleep.
Learning to build one kind of survival shelter is a great start, but there is no guarantee you will have the time or resources to build it. Make sure you are familiar with with multiple survival shelters and check out our Ultimate Guide to Bushcraft Shelters.

Leave a comment