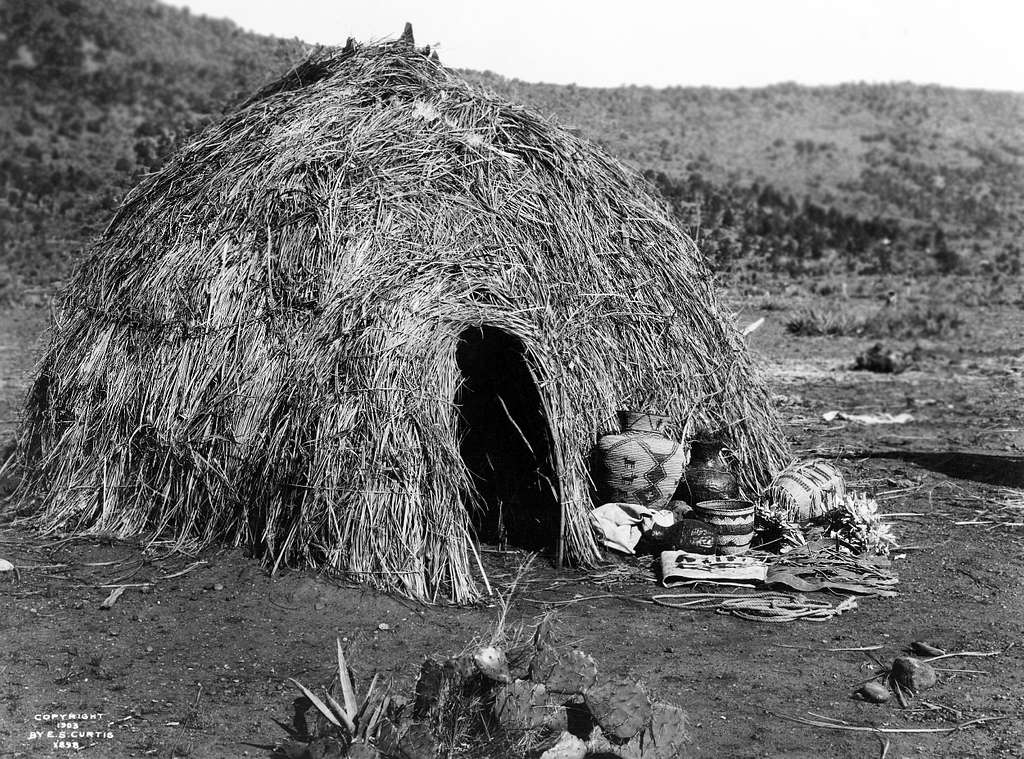
What is a Wickiup?
A wickiup, also known as a wigwam in certain areas, is a dome-shaped shelter traditionally built by Indigenous peoples of areas across North America. A wickiup is made from a framework of bent saplings covered with brush, grass, bark, or hides. The wickiup is a practical and time-tested structure ideal for both temporary and semi-permanent shelter and is relatively quick and easy to build. It provides solid protection from wind and rain and requires little to no tools to build.
Why Choose to build a Wickiup Shelter?
- Built entirely with natural materials
- Good insulation in cold or windy environments
- Provides more interior space than a lean-to or debris hut
- Great for long-term wilderness camps or bushcraft practice
- Spherical shape is structurally sound
Materials You’ll Need
- 10–20 flexible saplings, deoending on the size of the planned wickiup
- Natural cordage (vines, green bark or woven grass cords) or rope
- Brush, grass, leaves, pine boughs, or bark for covering
- Optional: animal hides or tarps for waterproofing
Step-by-Step: How to Build a Wickiup
1. Select and prepare a build site for your wickiup
Look for a flat, dry area with nearby saplings and brush so you won’t have to transport the building materials far. Nearby brush, boulders, and other natural barriers will make for a natural windbreak during inclement weather. Clear debris and rocks from the ground in the area that will be used as the shelter, levelling the ground if needed.
2. Create the Framework for the wickiup
Drive 4 of the longest saplings into the ground, spacing them evenly in a cross shape. These saplings should be vertical to the ground. Make sure these saplings are pushed far enough into the ground so the base stays secure in the ground while you are working. Bend the tops of the saplings toward the center to form a dome and lash them together securely with your cordage. The top of this structure should be no higher than chest height, but for survival situations you will ideally want it to be closer to waist height.
Add at least 4 more saplings between each of the first four, likewise bending them towards the center and binding them together. If you are building a shelter big enough for just one person, the eight saplings will be plenty, but if you are building a bigger shelter for multiple people you may need to add more.
3. Add More Saplings
Insert additional saplings horizontally around the vertical frame to create a strong lattice structure. Lash each end of the horizontal saplings with cordage to hold the entire frame together. Create different levels with the horizontal saplings, with each level being no more 4-6 inches apart. Leave a small gap between two of the vertical saplings that will not have any horizontal saplings crossing it. This gap will be the entrance later, so try to put this on the side of the shelter you think will get the least wind.
Reinforce the frame further by lashing the horizontal saplings in as many places as they cross a vertical sapling if you have sufficient cordage. At this point, you should have a recognizable dome-shaped frame.
4. Add Insulation and Weatherproofing
Cover the entire frame with thick layers of brush, grass, leaves, pine boughs, or bark for insulation. Start with the lowest level of horizontal saplings, working all the way around the bottom level first. Then, cover the next highest level, working all the way around the shelter again. Each level you go up should have the bottom part of the insulation on the outside of the level below it. Think of it like layering shingles on top of each other, so that as rain or moisture hits the insulation it will constantly run to the outside.
Once the entire dome is insultated, cover the dome-shaped structure with a tarp, hides, or other waterproof covering if available.
5. Create an Entrance for the wickiup
Hopefully you left a small gap as instructed above. If using a tarp or hides for weatherproofing, you can use any excess material from this to hang over the entrance for an easy door. Without a flexible cover like a tarp, it will be difficult to fashion a covering for this gap due to the bend from the wickiup’s natural bend.
If no tarp or hides are available for this, use extra saplings to create a short tunnel (maybe 1-2 feet long) for your entrance. Drive saplings into the ground on either side of the entrance, bending them towards each other to create an arch. Make 2-3 of these arches, connecting them together with horizontal saplings and insulating like you have the rest of the shelter. You can then use saplings to create a door the same size and shape as the opening.
6. Interior Enhancements
Lay down pine needles, leaves, or a tarp to insulate the area you plan to sleep. Never sleep directly on the ground or the ground will sap your body heat away. Create a small fire pit in the center if desired, but make sure to have a sufficiently sized ventilation hole in your roof directly above it to let the smoke out. You can create a removable cover for this ventilation hole, but never light a fire without having a way for the smoke to escape.
Pro Tips for building a wickiup
- Use green (fresh) saplings for flexibility when bending
- Choose insulating materials that are abundant and dry. Green insulation does not insulate nearly as well as dry materials
- Regularly check and reinforce lashings on the frame in windy conditions
- If conditions are snowy, sweep of snow periodically. The dome structure is very strong, but too much weight can cause it to collapse
Final Thoughts
Learning how to build a wickiup teaches valuable lessons in resourcefulness and primitive construction. It’s a practical shelter option that combines historical tradition with real-world survival utility; perfect for bushcraft enthusiasts or anyone looking to deepen their connection with the wilderness.
Learning to build one kind of survival shelter is a great start, but there is no guarantee you will have the time or resources to build it. Make sure you are familiar with with multiple survival shelters and check out our Ultimate Guide to Bushcraft Shelters.

Leave a comment