Mastering a few essential survival knots can make the difference between a secure shelter and a soggy disaster, or a successful rescue and a missed opportunity. These five versatile knots are critical tools in the bushcrafter’s and outdoorsman’s skillset. Learn what they do best—and what to watch out for.
Before beginning, here are a few terms you should know to better understand the instructions presented:
- Active end: The end of your cord that you will be moving and manipulating
- Standing end: the end of the cord you will not be moving
- Standing length: the portion of the cord between the stadning end and the knot you are tying
1. Bowline Knot
The bowline knot forms a fixed loop at the end of a rope that won’t slip or bind under load. This can be used to secure an item that will be under constant tension (such as mooring a boat or suspending something from a tree). The knot is easy to master, able to be tied one handed with some practice, and can be untied quickly and easily if needed.
Best Uses:
- Creating loops to secure tarps or tie down gear
- Rescue situations (can be tied around a person and won’t constrict)
- Hanging food away from animals
Potential Issues:
- Can work loose if not under constant tension, especially if your cord is made of a slippery material
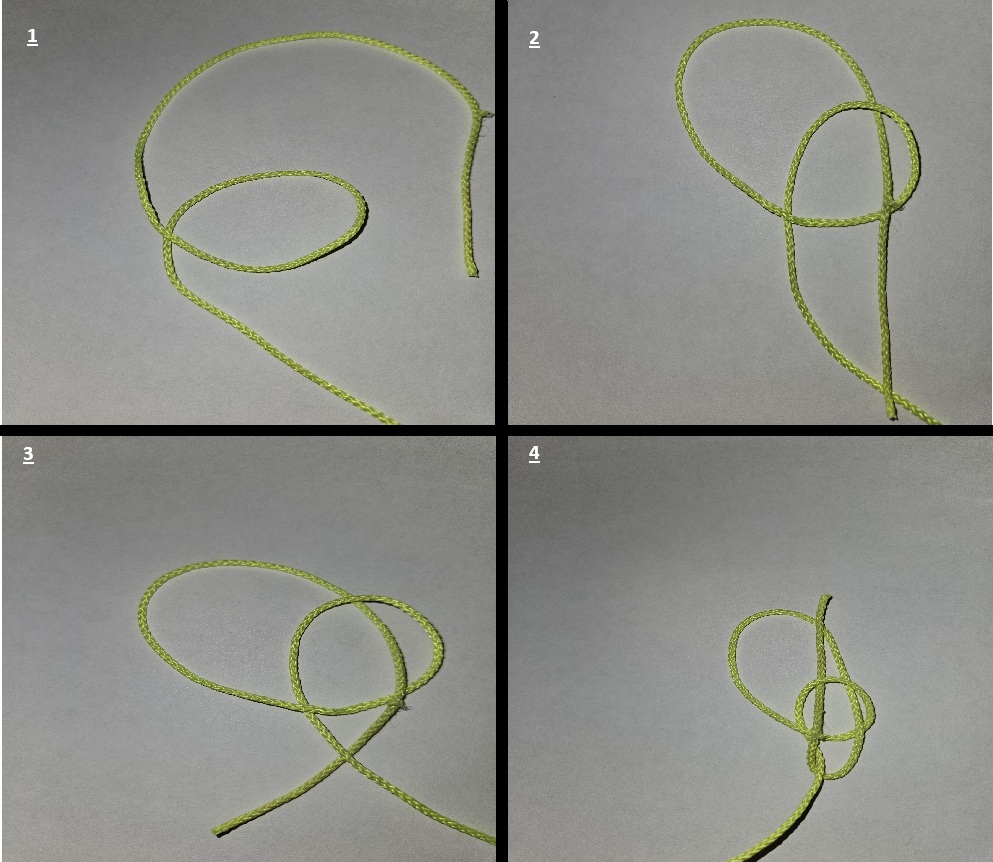
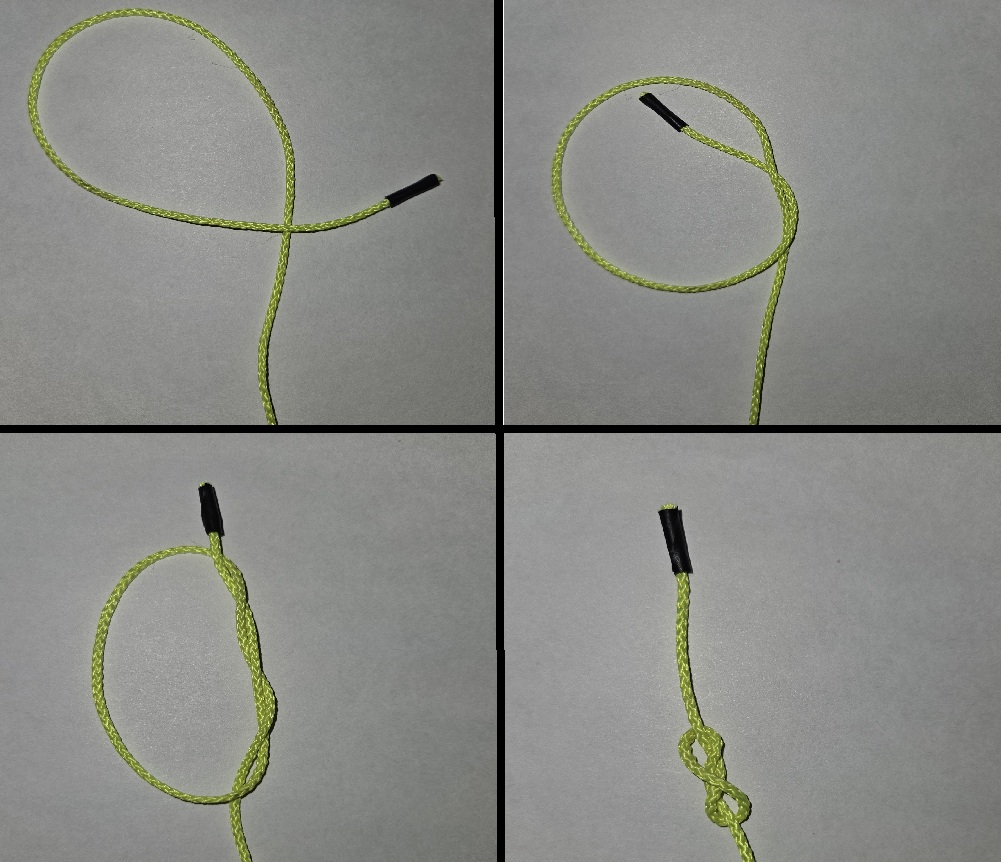
How to Tie a Bowline Knot:
- Create a loop in your rope or cord. Where the cord crosses itself to make the loop, the part leading to the active end should be on top of the part leading to the standing end. Make sure to leave enough room to work with on the active end of your cord.
- Bring the active end under and through the loop. The active end should now be roughly parallel to the standing length.
- Cross the active end under the standing length
- Bring the active end over the standing length and through the loop created in step #1. Hold the active end in place and pull the standing end to tighten the loop and complete the knot
2. Clove Hitch (AKA Double Hitch)
A clove hitch is a simple knot used to attach a rope to a post, pole, or tree. The hitch will tighten as tension is added to it, making it an ideal knot for mountaineering as well.
Best Uses:
- Securing guy lines on tents or shelters
- Hanging gear from trees or crossbeams
- Starting lashings for primitive structures
Potential Issues:
- May slip under load or when the rope isn’t taut
- Requires tension to stay secure
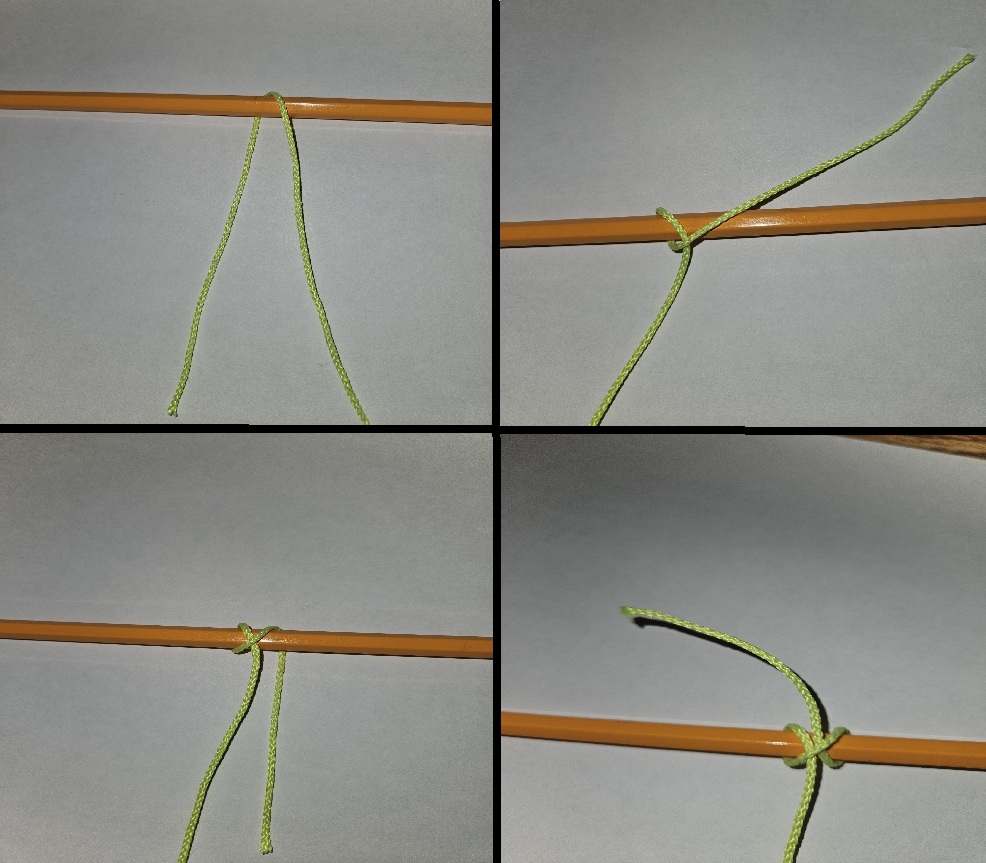
How to Tie a Clove Hitch
- Loop the active end of your cord over the top of the pole.
- Bring the active end under the pole and cross over the standing length and back over the top of the pole.
- Bring the active end back down over the pole.
- Pull the active end up parallel to the standing length and pull it through next to where the standing length was crossed in step #2 and pull tight. The end result should look like an “X” with the standing length coming out the bottom and the active end coming out the top of the “X.”
If you are trying to tie the clove hitch to a vertical post, the steps are the exact same. The only difference is that instead over going over the post, you would go around one side (I usually go over the right) and instead of going under you would go to the other side (in this case the left). The end result will still look like an “X,” but the standing length would be coming from the left and the active end would be towards the right. It can feel strange switching from vertical tying to horizontal or vice versa, so I recommend practicing both ways.
3. Square Knot (Reef Knot)
What It Is: A binding knot made by tying two overhand knots in opposite directions. When tied using two ends of the same piece of cordage it is called a square knot, but when used to tie two different pieces of cordage together it is called a reef knot
Best Uses:
- Tying two ropes of equal diameter together
- Securing bundles or gear
- Wrapping bandages or first aid applications
Potential Issues:
- Can slip with ropes of different sizes or synthetic materials
- Not load-bearing—don’t use for climbing or life safety
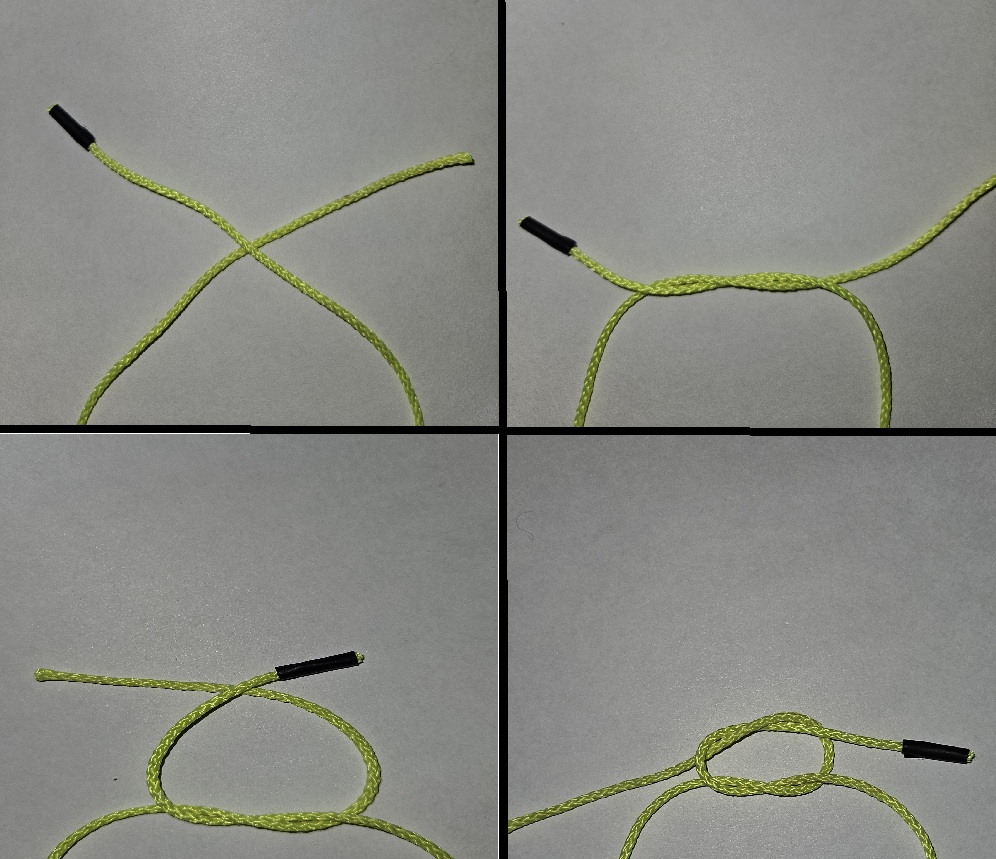
How to Tie a Square Knot:
- Pick one end of the cordage to be the active end (or pick one piece of cordage to be the active piece if tying two ropes together). cross the active end over the standing end.
- Tuck the active end under the standing end, forming a basic half knot.
- Cross the active end over the standing end again.
- Tuck the active end under the standing end again and pull tight. The resulting knot should look like a rounded square or rectangle.
Make sure that when the active end is coming out of the knot, it is parallel to where the active end entered the knot. Both where is enter and comes out of the knot should both be on top of the more vertical part of the standing end. If they are alternating (one above and one under the vertical part) it is a Granny Knot, a still serviceable but definitely inferior knot.
4. Double Overhand Knot
What It Is: A compact and secure stopper knot created by wrapping the working end of a rope twice around the standing part before pulling it tight. Used when you need to create a knot that won’t move, typically at the end of a rope to prevent the rope from passing through a hole (hence the term stopper knot), but can also be used to create a series of knots to use as handholds in a climbing rope.
Best Uses:
- Preventing the end of a rope from slipping through a hole or another knot
- Adding bulk to the rope end for grip or security
- Securing bundles or gear when combined with other knots
Potential Issues:
- Not suitable as a primary knot for joining ropes or bearing weight
- Can be difficult to untie after being heavily loaded
How to Tie a Double Overhand Knot
- Create a loop with the active end and cross it over the standing length
- Tuck the active end under the standing length and through the loop.
- Cross the active end over the standing length again and tuck through the loop a second time.
- Pull the active and standing ends to tighten the knot. Before being fully tightend, the knot should form a figure 8 shape
If you are using the double overhand knot to create a stopper at the end of the cordage, pull more on the standing end and try to work the knot to the desired place on the cordage. Always leave a decent amount at the end in case the knot slips a little bit.
5. Sheet Bend Knot
What It Is: A reliable knot for joining two ropes of the same or different diameters.
Best Uses:
- Extending rope length in emergencies
- Tying together natural cordage with synthetic lines
- Building nets or traps
Potential Issues:
- Can slip if ropes are significantly different thicknesses and not finished with a double sheet bend
- Needs regular inspection if used for prolonged periods
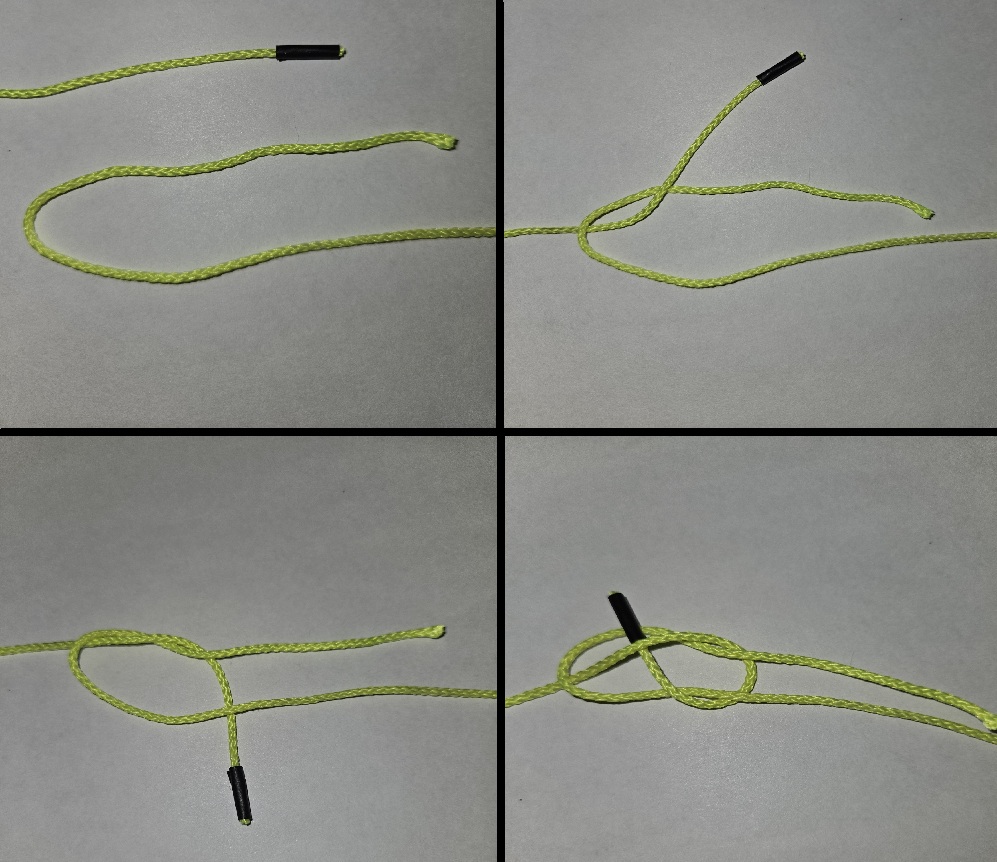
How to Tie a Sheet Bend Knot
- Pick one piece of cordage to be the standing end and standing length. If the cordage is of different thicknesses, the thicker should be the standing end and length. Make a “U” shape with the standing length (called a bight).
- Stick the active end through the bottom of the bight and cross over the standing end.
- Tuck the active end under both side of the bight (both the standing end and the standing length).
- Thread the active end between where the active end crossed the standing end in step 1. Pull both ends of the active cordage to tighten the knot.
If you are tying to pieces that are of significantly different thicknesses or just want extra security, then before tightening the knot loop the active end around both sides of the bight a second time. Then pull the active end through where it crossed the standing end in step 1 and pull tight. This is called a double sheet bend knot, a more secure version of the sheet bend knot.
Final Thoughts
Knowing these survival knots boosts your self-reliance and problem-solving ability in the outdoors. Each knot is suited to different purposes and situations. Practice each knot until it becomes second nature, and you’ll be ready to tackle a wide range of wilderness challenges from shelter building to rescue setups with confidence.
Learning how to tie a handful of basic knots is only the beginning of the skills you will need to master the outdoors. Make sure to check out our skills page for tips on everything you need to know.

Leave a comment